Run a local coding model with pi and LM Studio
This post is for people who generally use Claude, Codex, or Gemini but have heard you can run open-source models locally for free. The goal is to get you set up in no time so you can play around with the power of local models.
If you already use a coding agent, you already know how this works. A coding agent (e.g., Claude Code) talks to a model over an HTTP API: it sends your request, the model sends back tokens, and the agent uses tools (read, edit, run) to do real work. With Claude Code or Codex, that API lives in a datacenter and you reach it over the internet.
Running locally changes one main thing: where the endpoint is. Instead of pointing your agent at a remote provider, you point it at a server running on your own machine. Same request in, same completion out except the model just happens to be sitting on your local computer.
Here's the architecture, side by side:
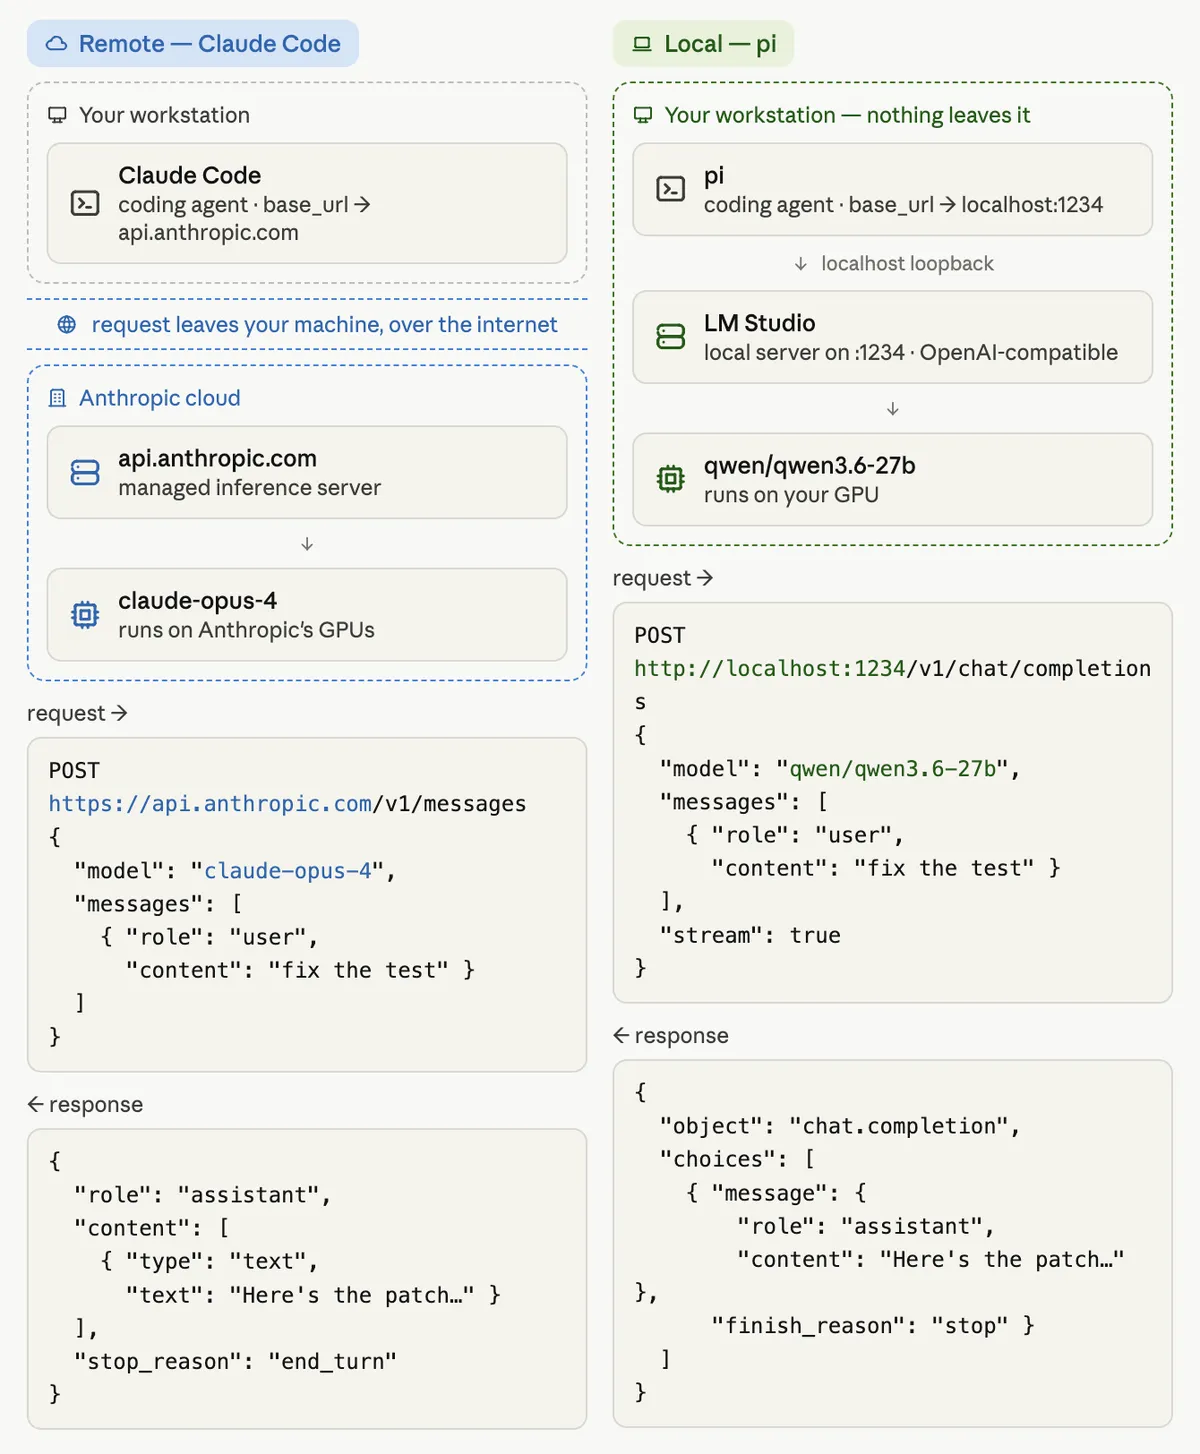
The three pieces on the local side:
- pi — the coding agent (the equivalent of Claude Code / Codex). It sends requests and runs tools.
- LM Studio — a local server that hosts the model and exposes an OpenAI-compatible endpoint on
http://localhost:1234/v1. You can use other options likeollamawhich is headless but we're going to stick with the easiest way (I think) and use LM Studio. - qwen/qwen3.6-27b — the actual model, running on your hardware which you can download through LM Studio.
Because pi speaks the OpenAI chat-completions protocol and LM Studio serves an OpenAI-compatible endpoint, hooking them together is a drop-in. You tell pi the base URL is localhost:1234, and that's the whole trick.
Step 1: Check what your machine can run
Before downloading anything, check your hardware. Two browser tools detect your GPU, VRAM, and RAM and tell you which models will actually run (and how well):
- https://www.canirun.ai/ — detects your hardware and grades models from "runs great" to "too heavy."
- https://www.caniusellm.com/ — similar check, plus quantization recommendations (which INT4/INT8/FP16 build fits your specs).
A 27B model like qwen3.6-27b at a 4-bit quant is roughly 15–16 GB of weights before you add any context, so a 24 GB GPU is a comfortable sweet spot. If your machine is smaller, the checker will point you at a model that fits.
I'm running this on an Apple M5 with 128 GB of unified memory. Because Apple Silicon shares that memory pool between CPU and GPU, the whole 128 GB is available to the model. A model like qwen3.6-27b plus a generous context window barely makes a dent, so I can run the full 256K window without thinking about it and even reach for higher-quality quants (Q6/Q8). If you've got a machine in this class you have plenty of headroom; on a smaller GPU, let the hardware checker steer your model and quant choice.
Quantization just means a compressed version of the weights. Q4 is the usual sweet spot between quality and size. If it fits and runs, you're good, don't overthink it for your first model.
Step 2: Install LM Studio and load your model
Download LM Studio (macOS, Windows, Linux) and install it. The docs walk through the app if you want them.
Inside LM Studio, use the model search to download qwen3.6-27b (or whichever model the hardware check recommended), picking the quant that fits your machine. Load it, then turn on the local server: open the Developer tab and toggle Start server. That's what exposes the OpenAI-compatible endpoint at http://localhost:1234/v1 that pi will talk to. (Server docs.)
Step 3: Install pi
pi is the coding agent. Install it with the official script:
curl -fsSL https://pi.dev/install.sh | sh
Or via npm if you prefer: npm install -g @mariozechner/pi-coding-agent. Either way, run pi --version to confirm it worked, and see the quickstart docs for first-run setup and logging into cloud providers. You could also use OpenCode but I prefer pi so let's run with it.
Step 4: Point pi at your local model
pi finds custom providers in a models.json file in your agent directory. Open it:
vi ~/.pi/agent/models.json
Here's how I configured mine:
{
  "providers": {
    "lmstudio": {
      "baseUrl": "http://localhost:1234/v1",
      "api": "openai-completions",
      "apiKey": "lm-studio",
      "models": [
        {
          "id": "qwen/qwen3.6-27b",
          "input": [
            "text"
          ]
        }
      ]
    }
  }
}
A few notes on what's going on here:
"api": "openai-completions"tellspito use the OpenAI chat-completions protocol. This is the part that makes any OpenAI-compatible local server (LM Studio, Ollama, vLLM) just work."apiKey": "lm-studio"is required but ignored by LM Studio — any non-empty string is fine.- The
"id"must match exactly what LM Studio exposes. If you're not sure, runcurl http://localhost:1234/v1/modelsand copy the id from there.
Once it's saved, you'll see the model in pi's model picker (/model). And whenever you want to jump back to a cloud model, the same picker switches you over with local and remote living side by side.
Step 5: Set your context size and reload the model
The context window is the model's working memory, meaning everything it can "see" at once. On a cloud model this is fixed for you. Locally, you choose it when you load the model, because a bigger context costs more VRAM (the KV cache grows with context length).
In LM Studio, set the context length on the model's load settings, then reload the model for it to take effect.

How much context you want depends on what you're doing and how much VRAM you can spare on top of the weights:
| What you're doing | Context size | Extra VRAM (rough) |
|---|---|---|
| A couple files | 16K | ~1 GB |
| Simple coding, UI development | 64K | ~4 GB |
| Multi-file refactors, medium complexity tasks | 128K | ~8 GB |
| Planning with full-repo contet | 256K | ~16 GB |
These are ballpark KV-cache numbers on top of the ~15–16 GB the 27B weights already use, so the full 256K window is pretty heavy. You have to budget for it before you crank the slider all the way to the right. When in doubt, start at 64K. It's plenty for day-to-day work and unless you find the agent making mistakes and forgetting things a lot, you can stick around here.
256K locally vs 1M in the cloud
qwen3.6-27b supports up to 256K tokens of context natively. For comparison, Claude Opus 4.8 runs in a 1M-token window. That gap is the main thing to keep in mind when deciding what to run where.
256K is still a lot and easily holds a focused slice of a codebase: the files for a feature, a module and its tests, a long debugging session. For most everyday coding, single-feature work, and contained refactors, you won't feel a limitation here but your mileage may vary.
Where the 1M cloud window pulls ahead is the whole-codebase, long-horizon stuff: loading an entire large repo at once, agentic tasks that run for hundreds of steps and accumulate huge history, or analyses that need to hold a giant document set in view. If you find yourself constantly trimming what you feed the model, that's the sign to reach for a cloud model for that task.
A reasonable rule of thumb:
- Local (qwen3.6-27b): focused edits, day-to-day coding, contained refactors, anything you want to run offline, privately, or at zero cost. A great use case is throwaway work where you don't want to spend tokens.
- Cloud (Claude / Codex / Gemini): whole-repo context, the hardest reasoning, and long agentic runs where the bigger window and top-tier capability earn their keep.
Re-use Claude Code skills
If you've built up SKILL.md skills for Claude Code, pi uses the same open Agent Skills standard (originally from Anthropic, now adopted across Claude Code, Codex, Gemini CLI, and more).
The catch is that pi only auto-discovers skills in its own locations by default. It does not look in ~/.claude/skills unless you tell it to. So if your Claude skills aren't showing up in pi, this is why.
Point pi at them in its settings file. Note this is settings.json, not the models.json from Step 4:
vi ~/.pi/agent/settings.json
Here's a full settings.json that points pi at your skills and boots it straight into your local model:
{
  "defaultProvider": "lmstudio",
  "defaultModel": "qwen/qwen3.6-27b",
  "skills": [
    "~/.claude/skills",
    "~/.codex/skills"
  ]
}
The skills array is a list of directories pi scans for SKILL.md folders. (defaultProvider and defaultModel are optional; they match the provider name and model id from your models.json in Step 4 so pi starts on your local model automatically.)
Then restart pi as it only scans skill locations at startup, so a running session won't pick up the change. After the restart, pi loads skills exactly the way Claude Code does with only the descriptions loaded in context, and the full instructions load on demand when a task matches (or when you force it with /skill:name).
Quick gotchas before you start
A list of the things that tripped me up:
- Start LM Studio's local server. Loading the model isn't enough and the server has to be switched on, or
pican't reachlocalhost:1234. This is the most common problem. - Match the model id exactly between LM Studio and your
models.json.curl http://localhost:1234/v1/modelsshows you the truth. - Expect it to be slower than cloud. A 27B running on your GPU won't hit cloud token rates, and the first load takes a moment. That's normal.
My workflow: Plan with Claude, build locally
pi isn't local-only. It has built-in support for Claude, so you can run cloud and local models from the same agent. Authenticate once with /login (it works with a Claude Pro/Max subscription or an Anthropic API key, stored in ~/.pi/agent/auth.json), and Claude shows up in the same /model picker as your local model.
That unlocks the workflow that makes local models genuinely practical: plan with Claude, execute locally.
- Use a Claude model for the thinking such as architecting a feature, breaking the work into steps where top-tier reasoning and the 1M window come into play.
- Then switch to your local model (
/model) to execute the plan: the repetitive edits, running tests, grinding through the refactor — for free, offline, and private. - Flip back and forth as much as you want within a single session. Cloud for the hard thinking, local for the volume.
- I use OpenSpec so I create the plans with Claude and execute locally
That's the whole setup. Check your hardware, install LM Studio and load a model that fits, install pi, drop a provider into models.json, set your context, and start coding. You're running a capable coding model entirely on your own machine.